정적 컨텐츠
정적 컨텐츠는 클라이언트의 요청을 받고 서버에 미리 저장된 파일을 그대로 응답해주는 것이다.
모든 클라이언트에 동일한 작업을 한다.
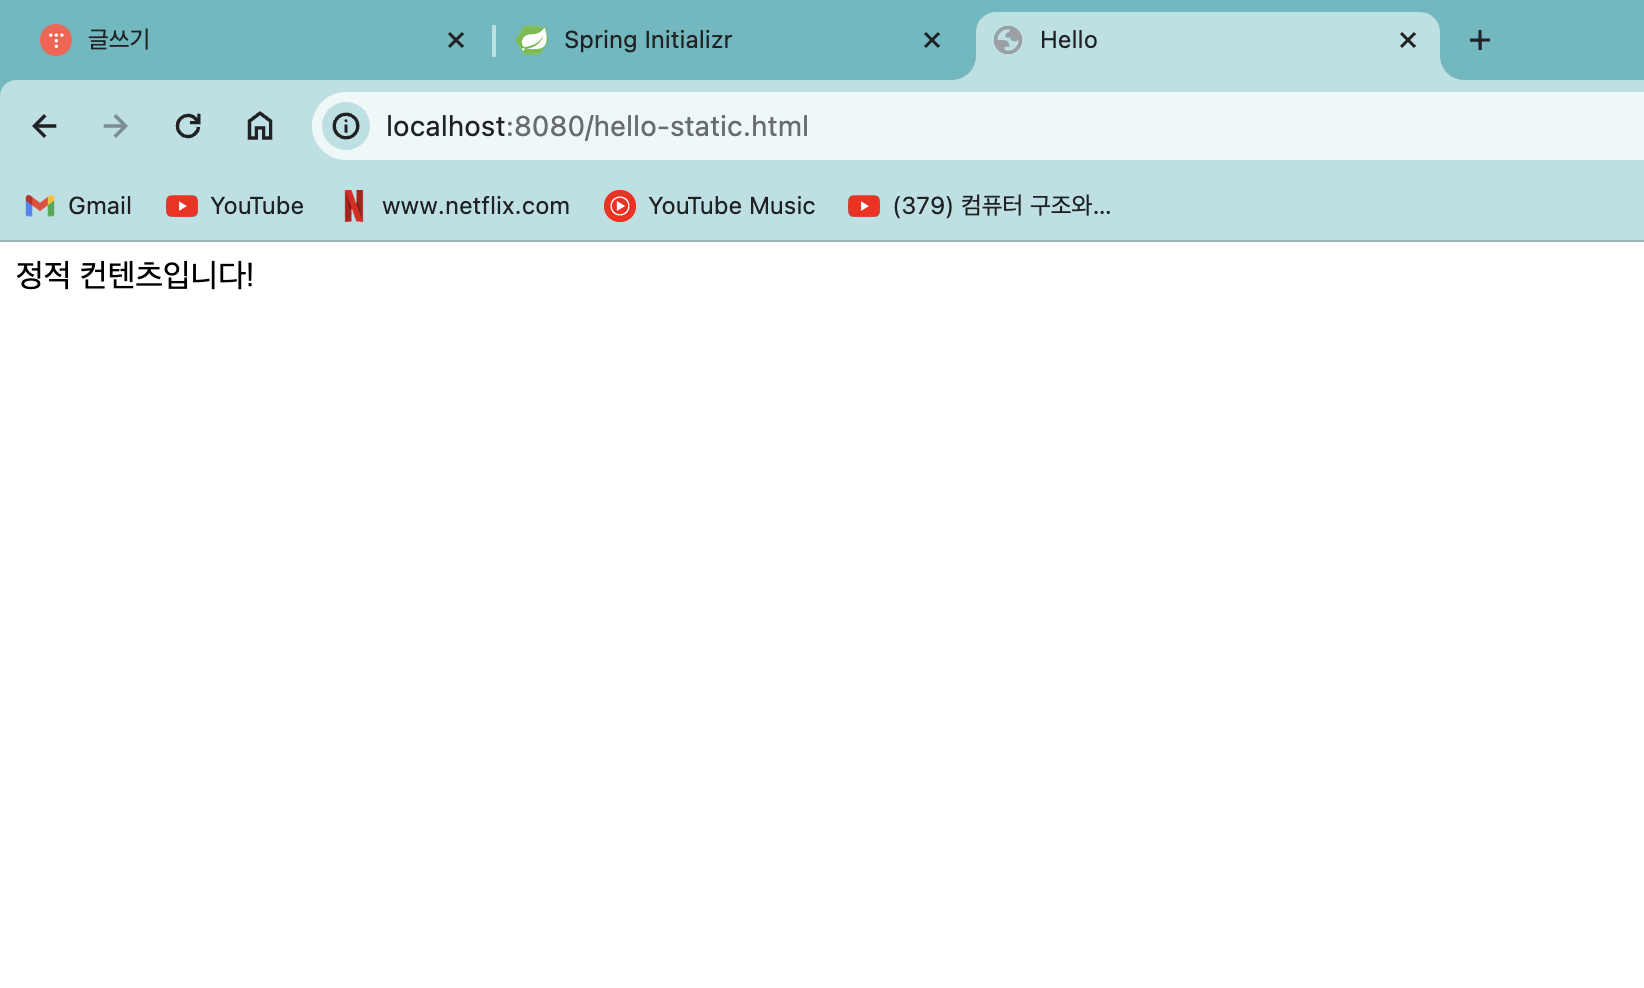
1. .../resources/static에 hello-static.html 생성
<!DOCTYPE HTML>
<html>
<head>
    <title>Hello</title>
    <meta http-equiv="content-type" content="text/html; charset=UTF-8"/>
</head>
<body>
정적 컨텐츠입니다!
</body>
</html>
2. 웹 브라우저에 [경로]/hello-static.html 입력
이게 어떻게 가능할까?
작동원리
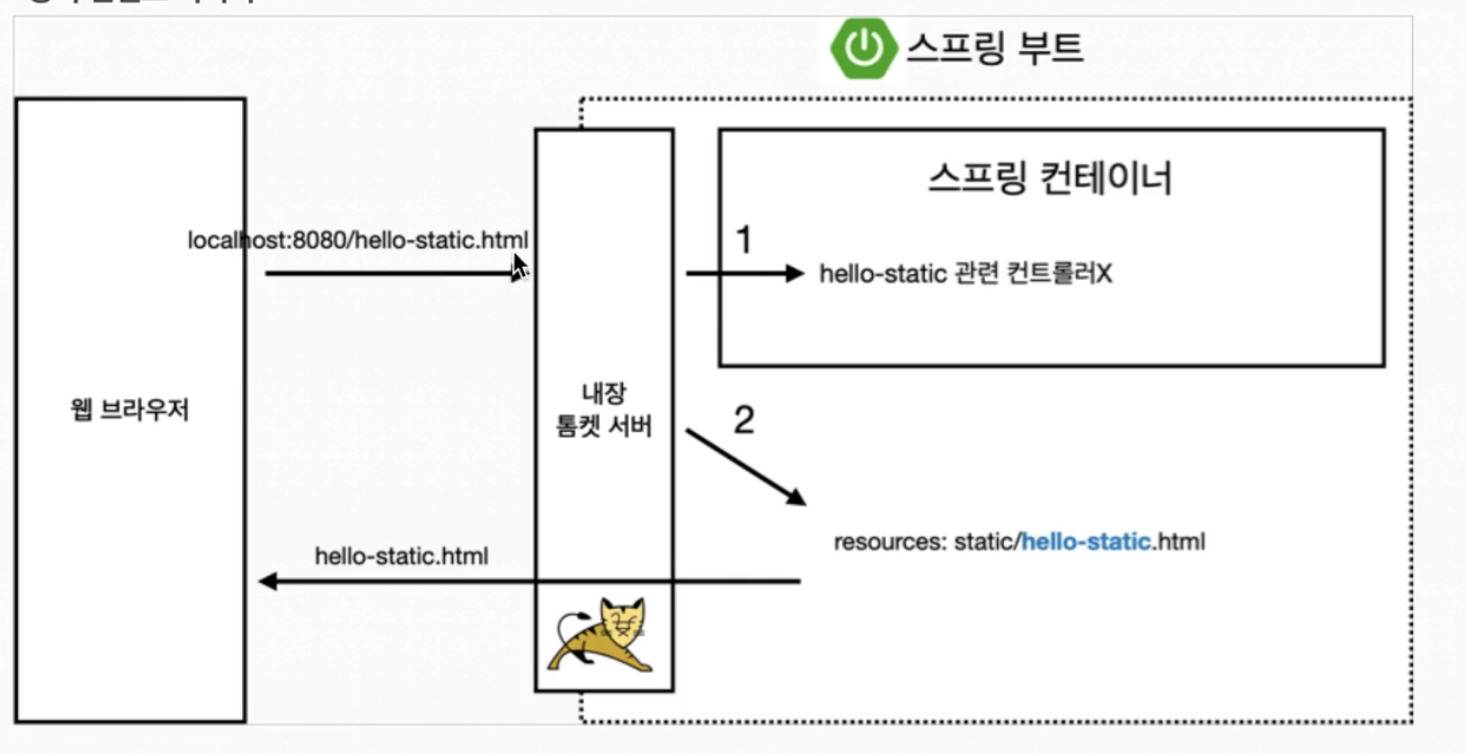
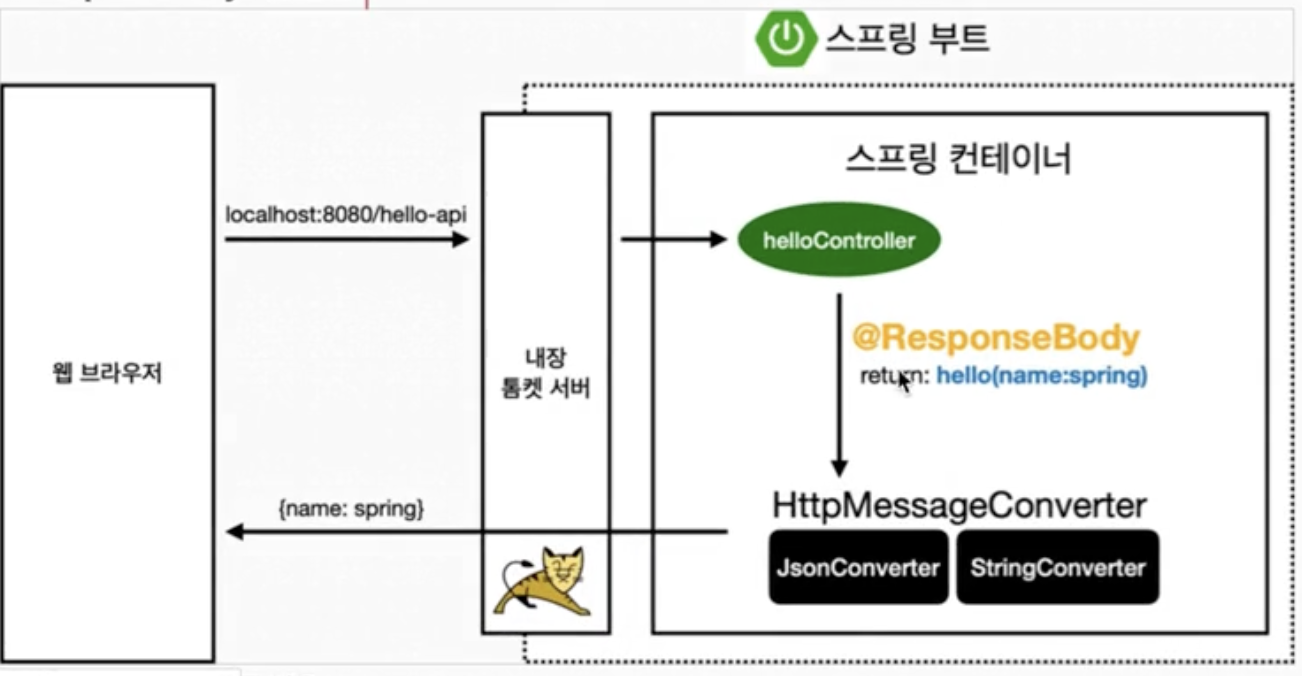
1. 웹 브라우저에서 [경로]/hello-static.html로 접속한다.
2. 톰켓 서버에서 스프링 컨테이너 안에 hello-static관련 컨트롤러가 있는지 확인한다.
3. 없으면 .../resources/static폴더 안에 hello-static.html이 있는지 확인한다.
4. 있으면 해당 html 파일을 웹 브라우저에 전송한다.
MVC와 템플릿 엔진
Controller
앞서 작성했던 helloController에 다음 코드를 추가한다.
@GetMapping("hello-mvc")
public String helloMVC(@RequestParam("name") String name, Model model)
{
    model.addAttribute("name", name);
    return "hello-template";
}
웹브라우저에서 [경로]/hello-mvc라고만 주소를 입력하면 에러 페이지가 뜬다.
그 이유는 @RequestParam 어노테이션 때문이다.
메서드가 실행되기 위해서는 이름 그대로 변수를 브라우저에서 입력을 받아야 한다.
어떻게?
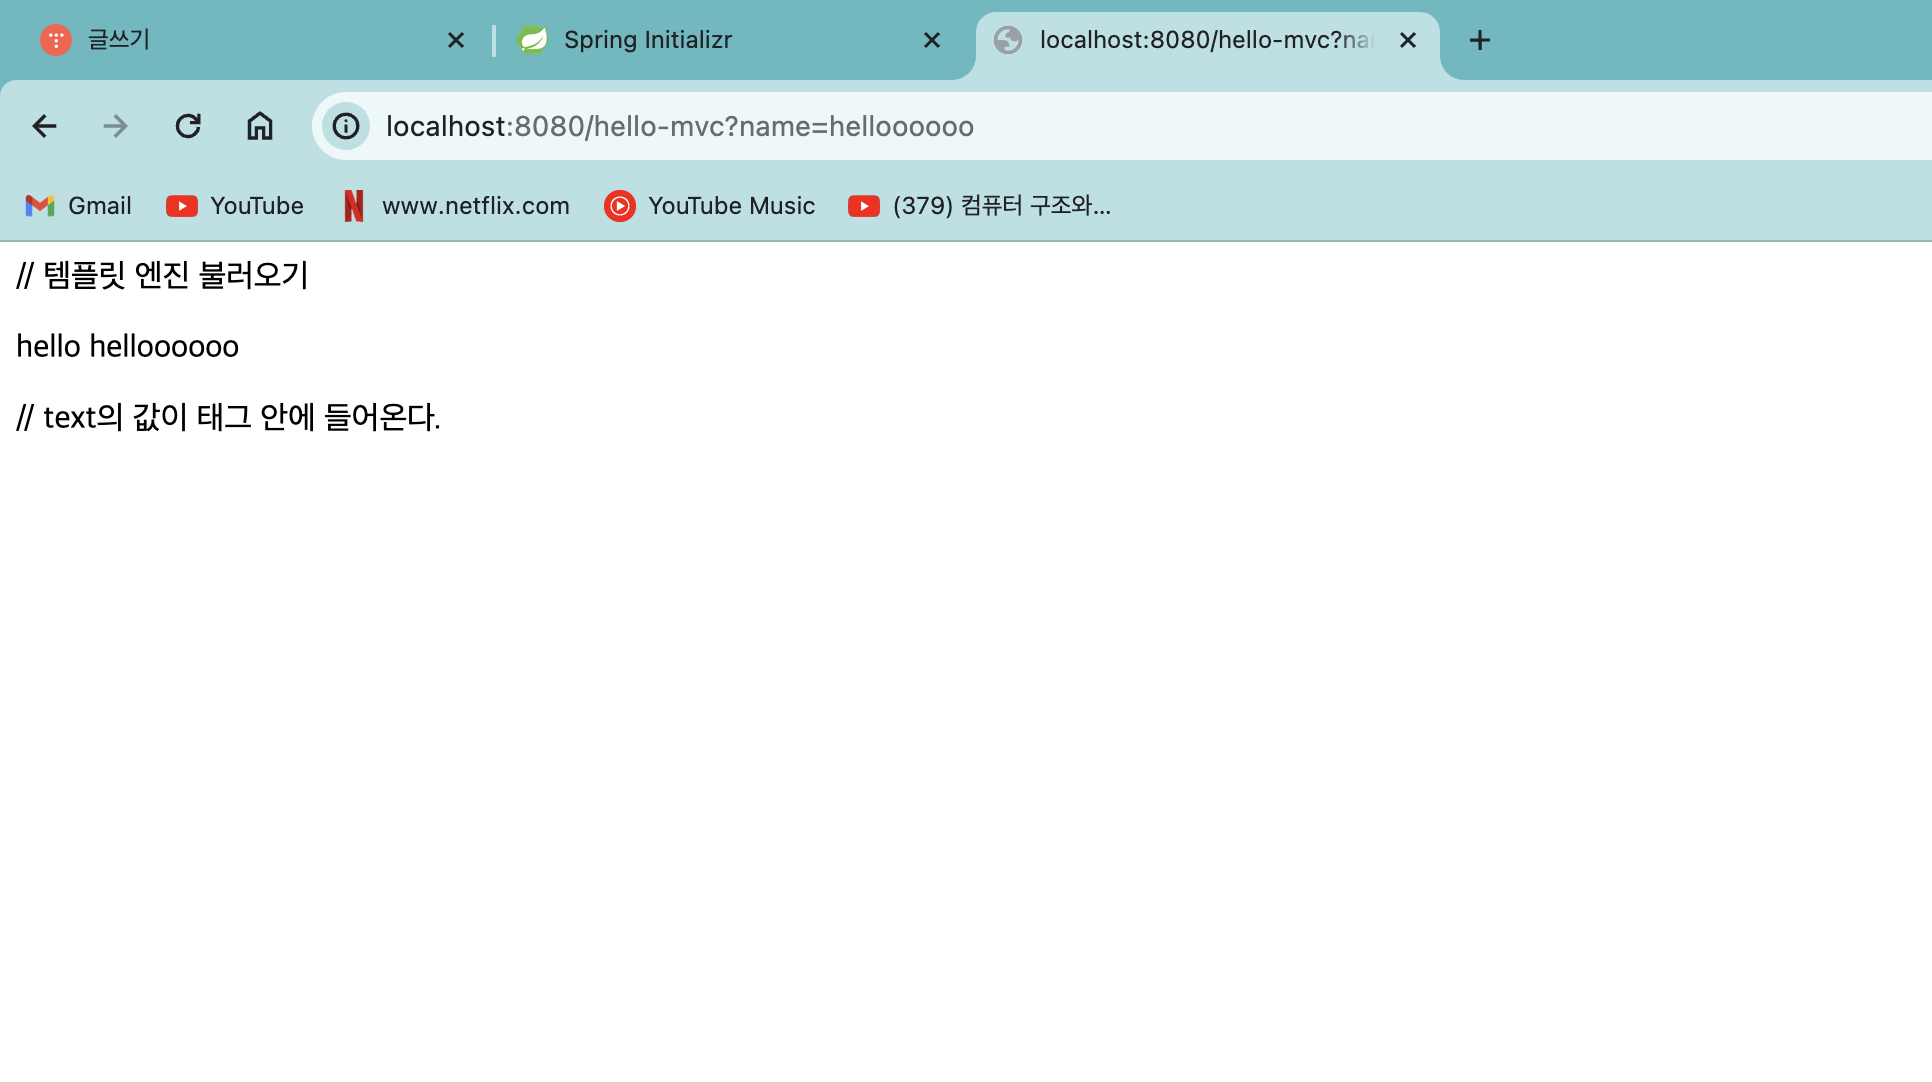
[경로]/hello-mvc?name=helloooooo
그러면 @RequestParam("name") String name의 변수 값이 "helloooooo"로 들어오게 된다.
그리고 "name"과 변수 값을 모델에 추가하고 View에 전송한다.
View
.../resources/templates 폴더에 다음 html을 생성한다.
<html xmlns:th="http://www.thymeleaf.org"> // 템플릿 엔진 불러오기
<body>
<p th:text="'hello ' + ${name}"></p> // text의 값이 태그 안에 들어온다.
</body>
</html>
컨트롤러에서 받아온 name의 밸류값인 helloooooo가 들어오게 된다.
그러면 text변수는 hello helloooooo가 되고, 그 값이 표시된다.
결과
API
helloController에 다음 코드를 추가한다.
static class Hello
{
    private String name;

    public String getName() {
        return name;
    }

    public void setName(String name)
    {
            this.name = name;
    }
}

@GetMapping("hello-string")
@ResponseBody // html의 body부분을 반환값으로
public String helloString(@RequestParam("name") String name, Model model)
{
    return "hello " + name;
}

@GetMapping("hello-api")
@ResponseBody // html의 body부분을 반환값으로
public Hello helloApi(@RequestParam("name") String name, Model model)
{
    Hello hello = new Hello();
    hello.setName(name);
    return hello;
}
@ResponseBody는 html의 body를 반환값으로 한다.
예제 1.
@GetMapping("hello-string")
@ResponseBody // html의 body부분을 반환값으로
public String helloString(@RequestParam("name") String name, Model model)
{
    return "hello " + name;
}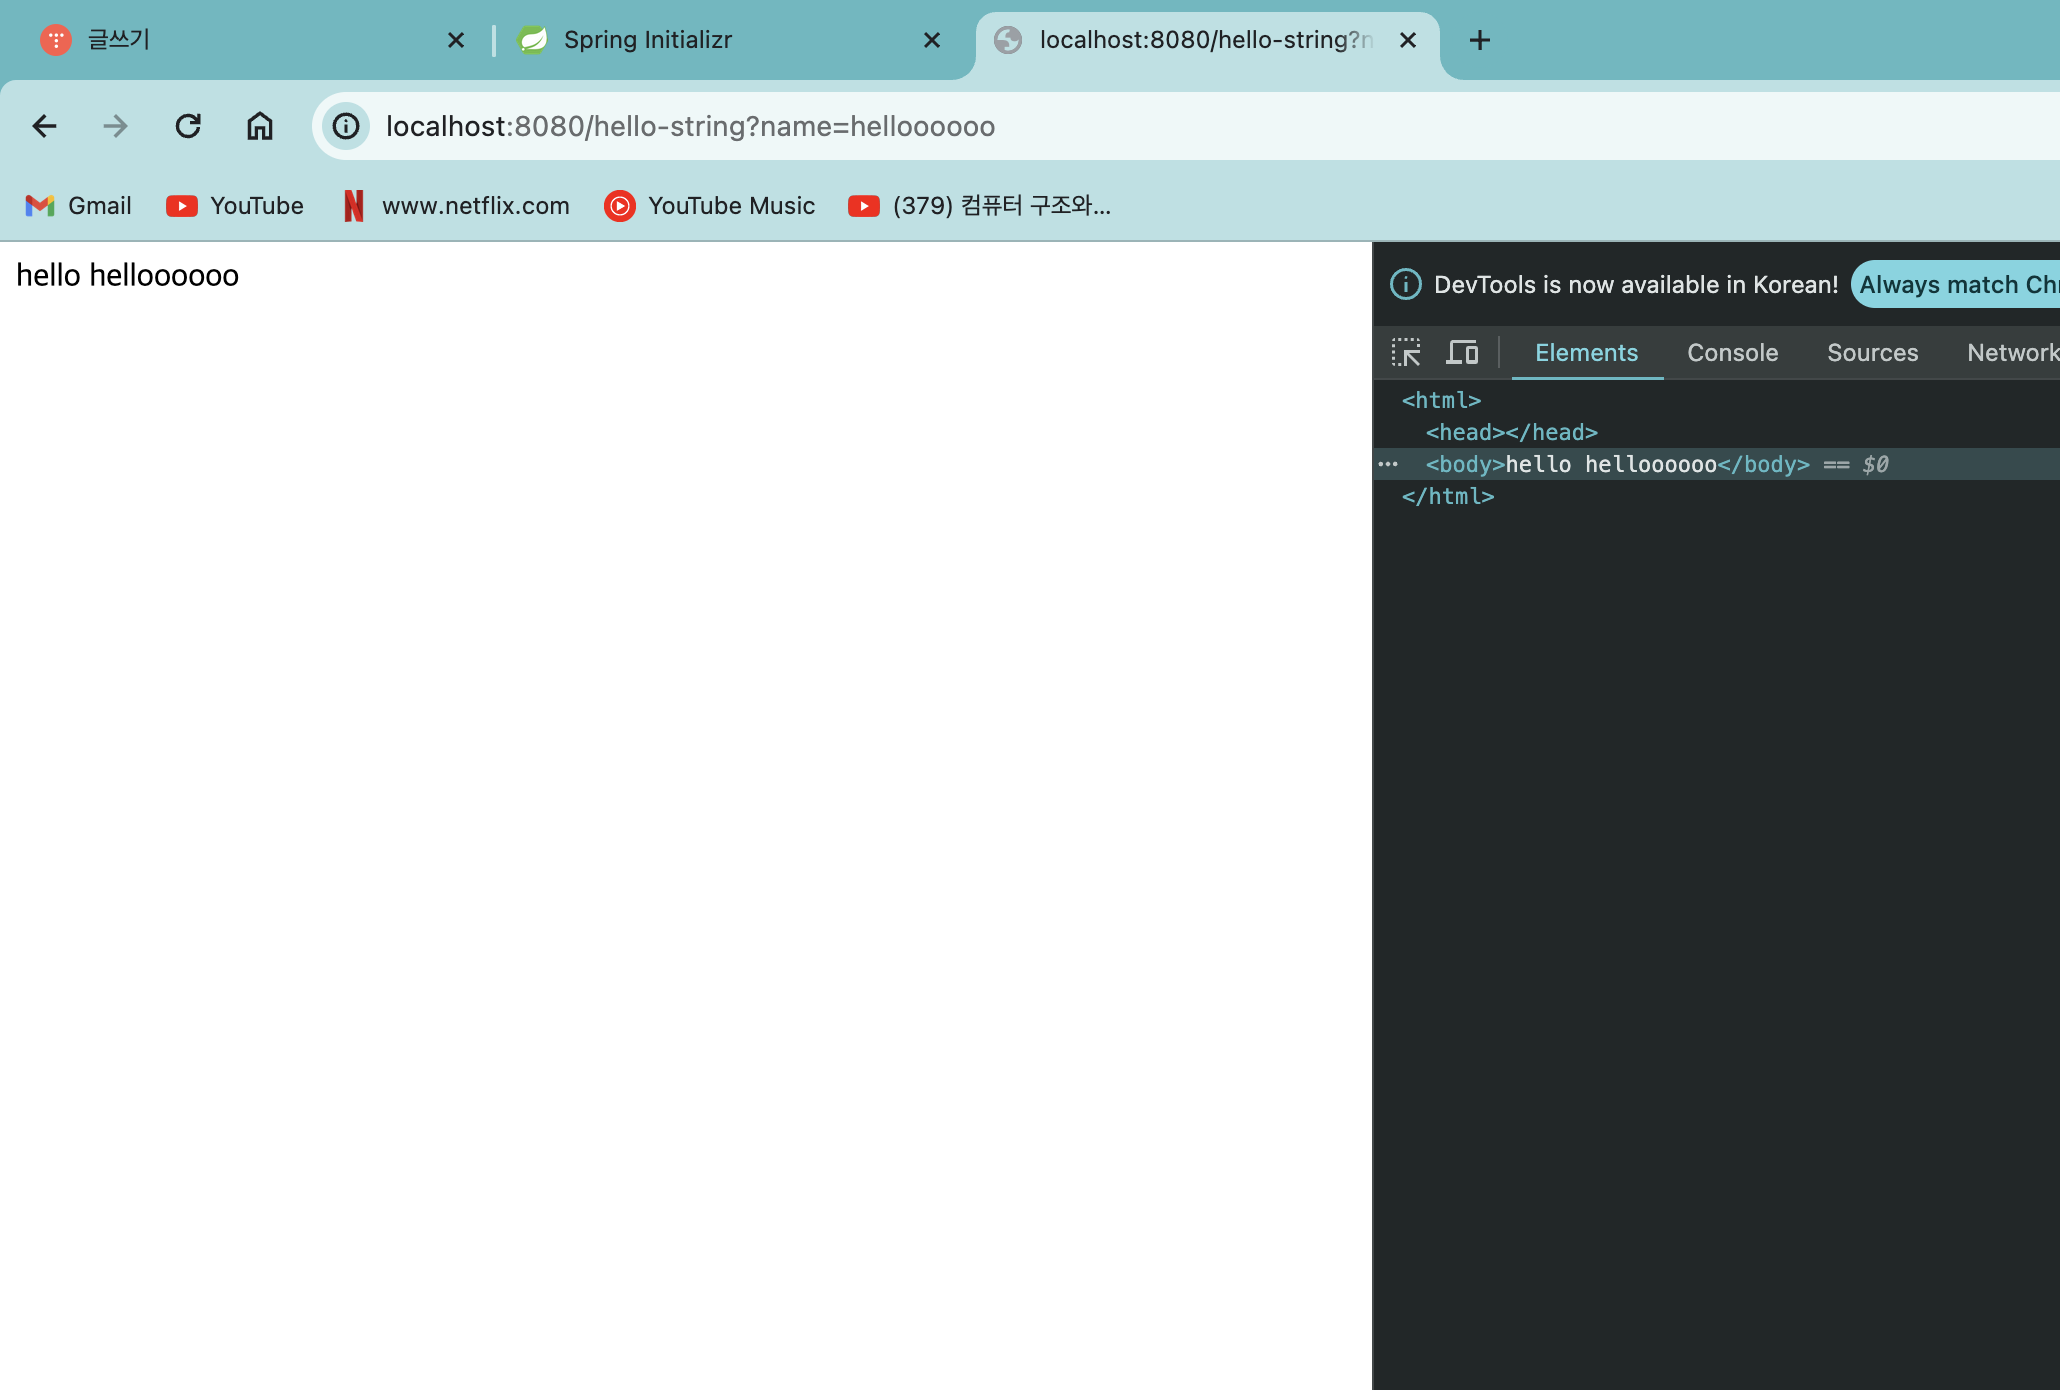
위 결과에서는 @RequestParam("name") String name의 값을 받고 메서드를 실행한 다음, 그 반환값을 body에 넣었다.
사실 이 결과는 의미가 없다고 볼 수 있다.
예제 2.
@GetMapping("hello-api")
@ResponseBody // html의 body부분을 반환값으로
public Hello helloApi(@RequestParam("name") String name, Model model)
{
    Hello hello = new Hello();
    hello.setName(name);
    return hello;
}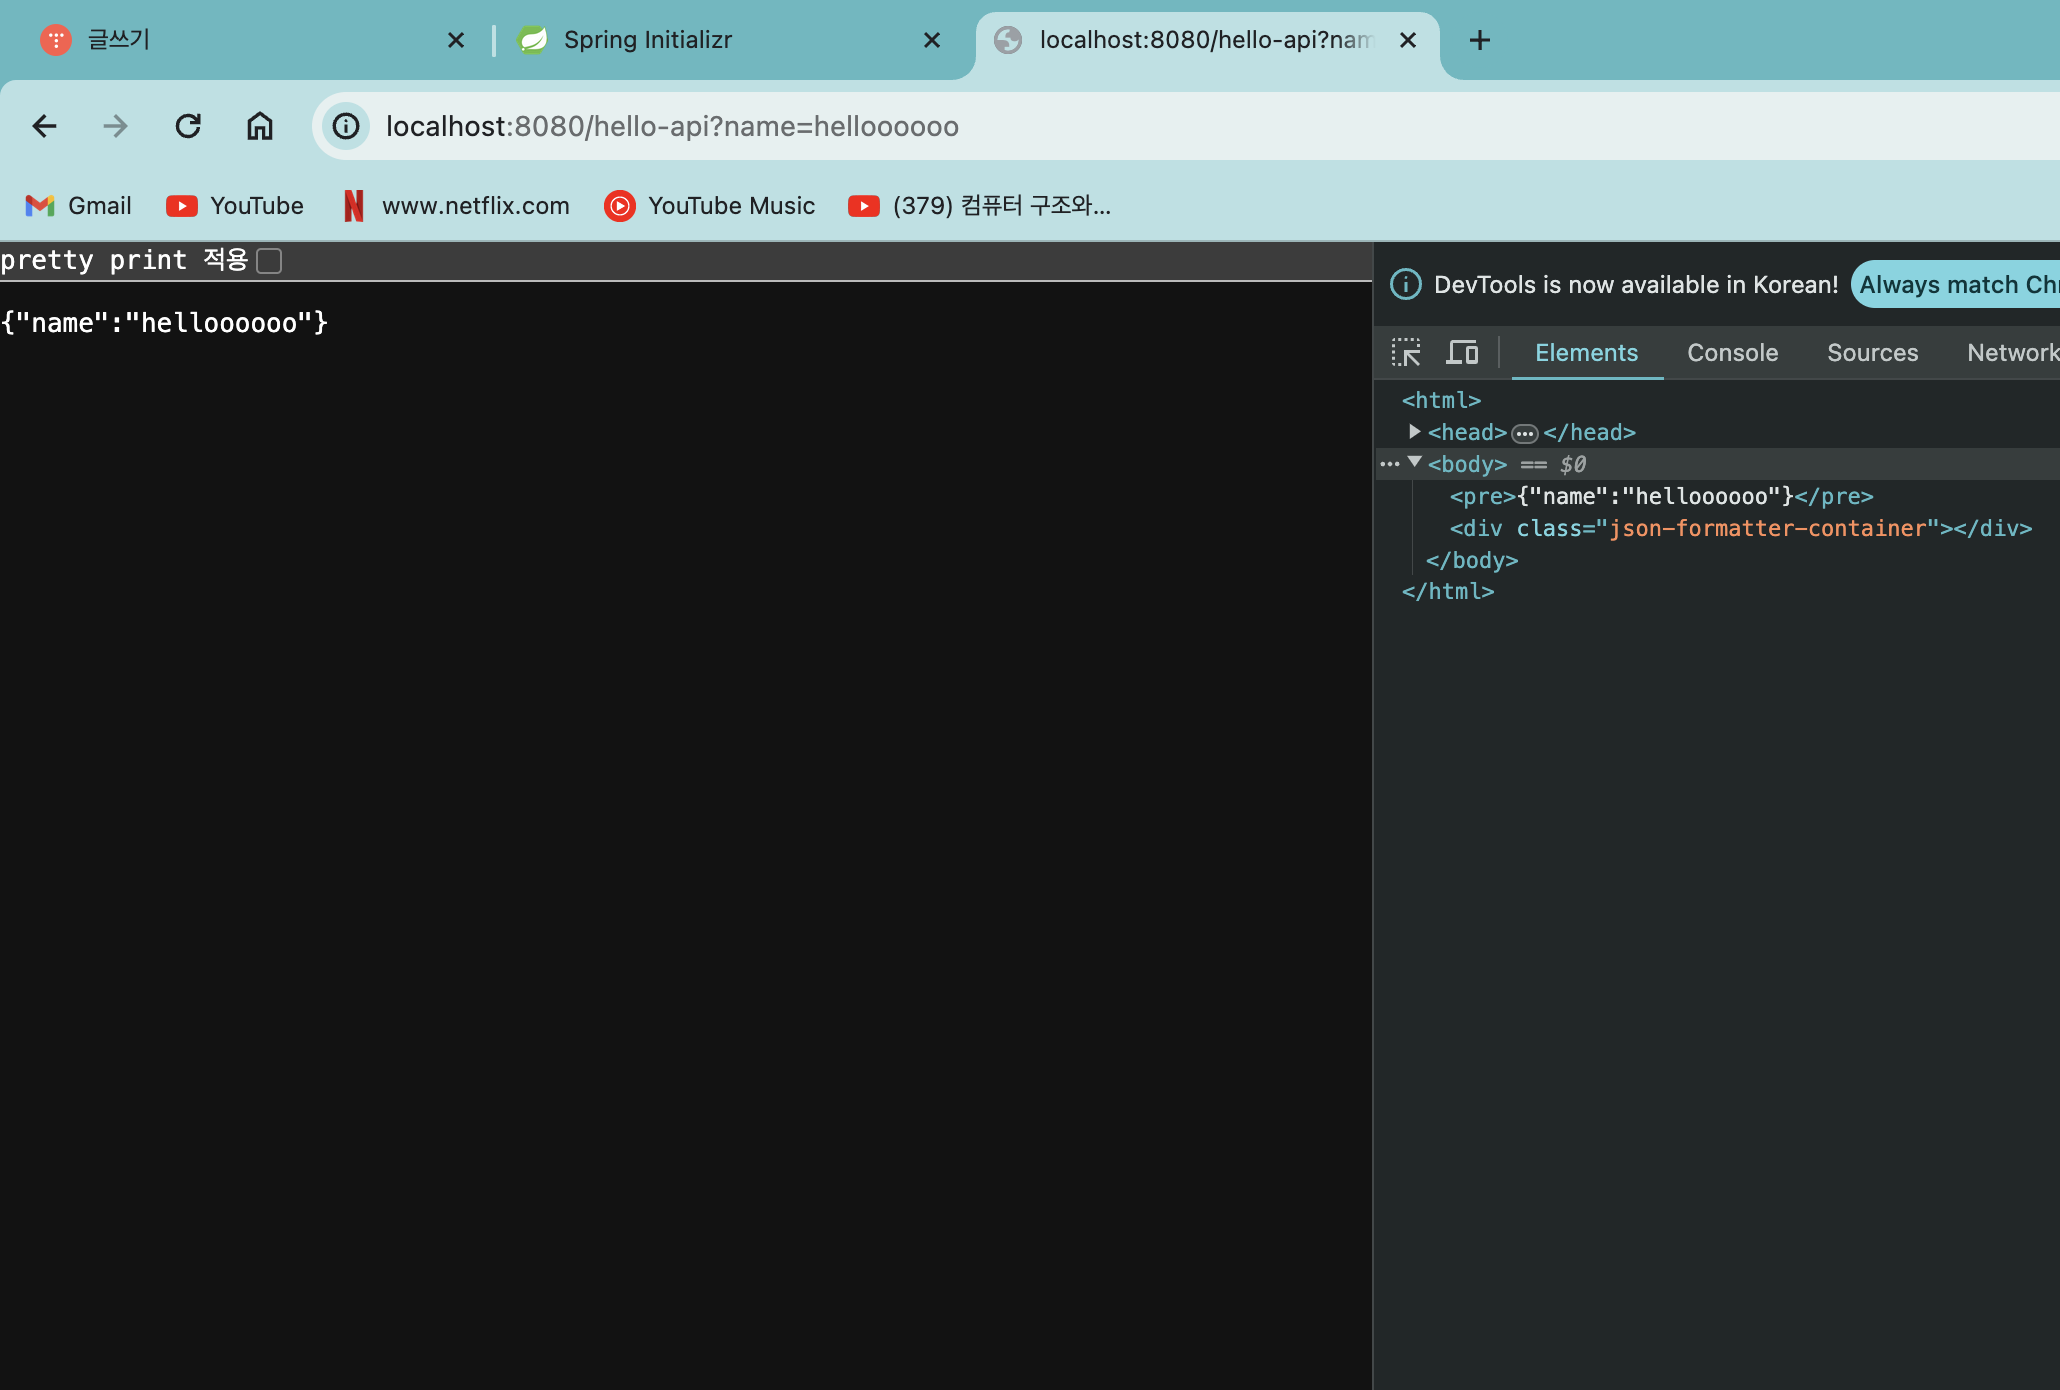
위 결과에서는 @RequestParam("name") String name의 값으로 새로운 객체를 생성하고,
해당 객체를 반환함으로써 JSON형태의 데이터를 body에 넣었다.
@ResponseBody 어노테이션이 없었으면 그냥 맞는 템플릿(html문서)를 찾아서 돌려줬는데
@ResponseBody 어노테이션이 있으면 그냥 그대로 데이터를 넣게 된다.
그리고 만약 반환값이 객체이면?
JSON으로 변환한다.
즉, 핵심은
API방식은 객체를 JSON으로 변환 후 반환하는 것이라고 할 수 있다.
'Spring' 카테고리의 다른 글
| Spring TIL - 01 스프링 환경설정 (0) | 2024.04.04 |
|---|